Grep: Commands and Example

In the vast landscape of Unix/Linux operating systems, where efficiency and precision are paramount, few tools rival the prowess of grep and egrep. These stalwarts of the command-line interface wield formidable power in the realm of text processing and data analysis. At their core, they are search and filter utilities, engineered to sift through oceans of text with surgical precision, extracting morsels of relevance from the vast expanse of data. Armed with regular expressions, grep and egrep can parse through log files, configuration files, source code, and any other text-based data source with unparalleled agility. Their versatility extends beyond mere search; they are indispensable instruments for pattern matching, enabling users to uncover insights, diagnose issues, and streamline workflows in diverse domains ranging from system administration to software development.

The grep command searches for patterns in one or more files. Its syntax is:

grep [options] pattern [file...]

It prints the lines that match the specified pattern. Basic regular expressions (BRE) can be used in the pattern.

Basic Syntax and Options

Basic Regular Expressions in grep:

  • . matches any single character except a newline.
  • * matches zero or more occurrences of the preceding character or pattern.
  • ^ matches the start of a line.
  • $ matches the end of a line.

Example Usage:

$ grep 'hello' file.txt  # Matches lines containing 'hello'
$ grep '^hello' file.txt  # Matches lines starting with 'hello'

Common Options:

  • -i: Ignores case distinctions.
  • -v: Inverts the match (prints non-matching lines).
  • -n: Prints line numbers.
  • -c: Prints the count of matching lines.
  • -r: Recursively searches subdirectories.
  • -l: Lists only the names of files with matching lines.

Use Cases for grep

  • Searching log files for specific patterns.
  • Filtering output from other commands.
  • Data analysis and text processing tasks.
  • Validating or cleaning up data.
  • Finding and replacing text in files.

egrep and Extended Regular Expressions

egrep (equivalent to grep -E) supports extended regular expressions (ERE), providing more powerful pattern matching capabilities. Unlike grep, which uses BRE syntax, egrep uses ERE syntax, allowing for additional metacharacters and more complex patterns.

Feature Comparison:

Featuregrep (BRE Syntax)egrep (ERE Syntax)
Basic PatternsSupports basic regular expressionsSupports extended regular expressions
SyntaxUses Basic Regular Expression (BRE) syntaxUses Extended Regular Expression (ERE) syntax
MetacharactersLimited metacharacter support: . * ^ $ []Extensive metacharacter support: . * ^ $ [] () {} + ? |
Alternation SyntaxNo support for alternation syntaxSupports alternation syntax using the pipe symbol (|)
UsageGenerally used for basic pattern matchingUsed for more complex pattern matching
PerformanceGenerally faster for simple patternsMay be slower for simple patterns due to added complexity
CompatibilityAvailable on most Unix-like systemsAvailable on most Unix-like systems

Example Usage:

$ grep 'apple' fruits.txt  # Basic pattern matching
$ egrep 'apple|orange' fruits.txt  # Complex pattern matching with alternation

The importance of grep and egrep transcends mere convenience; it lies at the very heart of Unix philosophy: doing one thing and doing it well. Their efficiency in handling text-based tasks has made them indispensable components of the Unix toolchain, empowering users to navigate the labyrinth of data effortlessly. Whether it’s pinpointing errors in a software log, extracting relevant information from a sprawling dataset, or crafting intricate search queries to unearth hidden gems, grep and egrep stand as steadfast allies in the quest for knowledge and insight. In the hands of adept users, these humble utilities transform raw data into actionable intelligence, illuminating pathways to understanding and driving innovation in the ever-evolving landscape of information technology.

Practical Examples

Example 1: Search for lines starting with “hello”

$ grep '^hello' file.txt

Example 2: Search for “apple” or “orange” using egrep

$ egrep 'apple|orange' fruits.txt

Writing a grep Command to Display Lines Not Matching a Given Pattern

To display lines that do not match a given pattern, use the -v option:

$ grep -v 'pattern' file.txt

Example: Finding names “Deepak”, “Dipak”, and “Deepk” To find lines that do not contain any of these names, use:

$ grep -v -E 'Deepak|Dipak|Deepk' file.txt

Here, -E enables extended regular expressions, allowing the use of the alternation operator |.

This command will print lines from file.txt that do not contain any of the names “Deepak”, “Dipak”, or “Deepk”.

grep and egrep are indispensable tools for anyone working with text data in Unix/Linux environments. With their ability to search, filter, and manipulate text based on patterns, they provide a robust solution for text processing and data analysis tasks. Understanding the differences between basic and extended regular expressions and the various options available in grep and egrep enhances their utility in practical applications.

AWK command in Unix/Linux

AWK: A Versatile Tool for Text Processing

AWK is a powerful scripting language designed for manipulating data and generating reports. Named after its creators—Alfred Aho, Peter Weinberger, and Brian Kernighan—AWK excels in text processing, making it an essential tool in Unix/Linux environments. The AWK command programming language requires no compiling, allowing the user to employ variables, numeric functions, string functions, and logical operators seamlessly.

Core Capabilities of AWK

AWK is a utility that enables programmers to write concise and effective programs using a series of statements. These statements define text patterns to search for in each line of a document and specify the actions to take when a match is found. Primarily used for pattern scanning and processing, AWK searches one or more files for lines matching specified patterns and then performs associated actions.

Basic Syntax

An AWK program consists of patterns and actions, written in the form:

pattern { action }

If a line matches the pattern, the associated action is executed. If no pattern is provided, the action is executed for every input line.

Patterns and Actions

  • Patterns: Can be regular expressions, numeric comparisons, string comparisons, or combinations thereof.
/pattern/ { action }    # Matches lines containing the specified pattern
NR > 5 { action }       # Matches lines with line number greater than 5
$1 == "value" { action } # Matches lines where the first field is equal to "value"
  • Actions: Enclosed in curly braces {} and define what to do when a pattern is matched.
{ print $2 }            # Prints the second field of each line
{ sum += $3 }           # Calculates the sum of the third field
/pattern/ { print "Found!" } # Prints "Found!" for lines matching the pattern

Fields and Records

AWK automatically splits input lines into fields based on whitespace by default. Fields can be accessed using $1, $2, etc., where $1 refers to the first field, $2 to the second field, and so on. The entire line is referred to as $0. Records are lines of input separated by record separators (usually newline characters).

{ print $1, $3 }  # Prints the first and third fields of each line

Built-in Variables

AWK provides several built-in variables for convenience:

  • NR: Current record number
  • NF: Number of fields in the current record
  • FS: Input field separator
  • RS: Input record separator
  • OFS: Output field separator
  • ORS: Output record separator
NR > 10 { print $NF }  # Prints the last field of lines with record number greater than 10

Functions

AWK supports built-in functions for string manipulation, mathematical operations, and more.

{ result = toupper($1) }  # Converts the first field to uppercase

Command-Line Usage

AWK can be invoked from the command line using the awk command followed by the AWK program and input files.

awk '/pattern/ { action }' input.txt

Advanced Features

AWK supports advanced features like arrays, user-defined functions, formatted printing, and input redirection.

BEGIN { FS = "," }  # Sets the field separator to comma
{ array[$1] = $2 }  # Populates an array with values from the first and second fields
END { for (key in array) print key, array[key] }  # Prints the contents of the array

Common Use Cases

AWK is commonly used for:

  • Text searching and filtering
  • Extracting specific columns from CSV files
  • Performing calculations on numeric data
  • Generating reports

Here’s a simple example of an AWK program that prints lines containing the word “error” from a log file:

awk '/error/ { print }' logfile.txt

This command prints all lines from logfile.txt that contain the word “error”.

AWK Programming Constructs

AWK supports various programming constructs that make it a versatile tool:

  • Format output lines
  • Arithmetic and string operations
  • Conditionals and loops

Example Commands

  • Print every line of data from a file:
$ awk '{print}' employee.txt

By default, AWK prints every line of data from the specified file.

  • Print lines that match a given pattern:
$ awk '/manager/ {print}' employee.txt
  • Split a line into fields:
$ awk '{print $1,$4}' employee.txt
  • Display record number and line:
$ awk '{print NR,$0}' employee.txt
  • Display the first and last fields:
$ awk '{print $1,$NF}' employee.txt
  • Display lines from 3 to 6:
$ awk 'NR>=3, NR<=6 {print NR,$0}' employee.txt

AWK is a versatile tool for text processing and data manipulation in UNIX/Linux environments. Its concise syntax and powerful features make it an essential tool for any programmer or system administrator working with structured text data. Whether you need to search and filter text, extract columns, perform calculations, or generate reports, AWK offers a robust and efficient solution.

Largest of three Numbers in Shell (SH)

When writing a shell script to find the largest of three numbers, the process involves reading input from the user, comparing the numbers, and determining which one is the largest. Shell scripts are powerful tools in Unix/Linux environments, and they help automate repetitive tasks. In this script, we will use basic shell scripting constructs such as variable assignment, conditional statements, and arithmetic operations to achieve our goal.

In this shell script, we compare three numbers—num1, num2, and num3—to determine the largest among them. This is achieved using conditional statements. The logic involves sequentially comparing each pair of numbers. If num1 is greater than or equal to both num2 and num3, then num1 is the largest. If not, the script checks if num2 is greater than or equal to both num1 and num3. If this condition holds true, then num2 is the largest. If neither of these conditions is true, the script concludes that num3 must be the largest. This systematic comparison ensures that all possible scenarios are covered, guaranteeing the correct result.

Prompt for Input:

  • First, we need to prompt the user to enter three numbers. This can be achieved using the echo command to display a message and the read command to capture the user’s input.

Variable Assignment:

  • Assign the user input to three variables, say num1, num2, and num3.

Comparison Logic:

  • Use conditional statements (if-elif-else) to compare the three numbers.
  • For the comparisons, utilize arithmetic comparison operators within the double parentheses (( )) for more intuitive arithmetic operations.
  • Determine which number is the largest by comparing each pair of numbers and updating a variable, say largest, with the maximum value.

Output the Result:

  • Finally, print the largest number using the echo command.

Shell Script

Here is the complete shell script implementing the above logic:

#!/bin/bash

# Prompt the user to enter three numbers
echo "Enter first number: "
read num1
echo "Enter second number: "
read num2
echo "Enter third number: "
read num3

# Compare the numbers and find the largest using (( ))
if (( num1 >= num2 && num1 >= num3 )); then
    largest=$num1
elif (( num2 >= num1 && num2 >= num3 )); then
    largest=$num2
else
    largest=$num3
fi

# Print the largest number
echo "The largest number is: $largest"

Explanation

Prompt for Input:

echo "Enter first number: "
read num1
echo "Enter second number: "
read num2
echo "Enter third number: "
read num3

The script begins by prompting the user to enter three numbers. The echo command displays the prompt and the read command captures the input and assigns it to the variables num1, num2, and num3.

Comparison Logic:

if (( num1 >= num2 && num1 >= num3 )); then
    largest=$num1
elif (( num2 >= num1 && num2 >= num3 )); then
    largest=$num2
else
    largest=$num3
fi
  • The script then uses an if-elif-else structure to compare the three numbers.
  • if (( num1 >= num2 && num1 >= num3 )): Checks if num1 is greater than or equal to both num2 and num3. If true, num1 is assigned to the variable largest.
  • elif (( num2 >= num1 && num2 >= num3 )): If the first condition is false, this checks if num2 is greater than or equal to both num1 and num3. If true, num2 is assigned to largest.
  • else: If neither of the above conditions is true, num3 is assigned to largest.

Output the Result:

echo "The largest number is: $largest"
  • Finally, the script prints the largest number using the echo command.

This script demonstrates the basic structure and flow of a shell script used to find the largest of three numbers. The use of (( )) for arithmetic comparisons makes the logic clear and easy to understand.

100 इंस्टाग्राम बायो लड़कियों के लिए – Instagram Bio For Girls

अगर आप अपनी इंस्टाग्राम प्रोफाइल को और भी आकर्षक और खास बनाना चाहती हैं, तो सही बायो का होना बहुत जरूरी है। यहाँ हम 100 इंस्टाग्राम बायो लड़कियों के लिए (Instagram Bio For Girls) लेकर आए हैं, जो आपके व्यक्तित्व (Personality) को शानदार तरीके से पेश करेंगे और आपके Followers को भी प्रेरित करेंगे। चाहे आप Positivity फैलाना चाहती हों, अपनी शालीनता (Decency) दिखाना चाहती हों, या फिर अपनी साहसी (Daring) और आजाद आत्मा को उजागर करना (Exposing the free spirit) चाहती हों, इन बायो में हर लड़की के लिए कुछ न कुछ खास है। अपने इंस्टाग्राम प्रोफाइल को इन अनोखे और सुंदर बायो के साथ सजाएं और अपनी चमक दुनिया को दिखाएं।

Instagram Bio girls ladkiyon

100 इंस्टाग्राम बायो लड़कियों के लिए

  1. 🌸 सपनों को हकीकत बनाने के लिए मेहनत जरूरी है, वरना सिर्फ सपने रह जाते हैं।
  2. 💖 प्यार और खुशियाँ बाँटने में यकीन रखती हूँ, जिंदगी छोटी है यार।
  3. 🎀 शालीनता और सादगी का मेल, यही मेरा स्टाइल है।
  4. 🌟 अपनी दुनिया में खुश, जहाँ हर दिन खास है।
  5. 💫 सपने बड़े हैं और दिल मजबूत, जिंदगी में उड़ान भर रही हूँ।
  1. 🌷 खुशबू की तरह फैलती हूँ, प्यार और खुशी के साथ।
  2. 🌈 इंद्रधनुष के रंगों से अपनी जिंदगी रंग रही हूँ।
  3. 🌸 हर दिन नए रंगों में खिल रही हूँ, अनुग्रह के साथ।
  4. 🦋 सपनों की चिड़िया, जो हमेशा ऊँचाइयों की ओर उड़ रही है।
  5. 🌟 अपनी धूप खुद ही बना रही हूँ, क्योंकि बादल ज्यादा दिन तक टिकते नहीं।
  6. 🎉 रंग-बिरंगी जिंदगी जी रही हूँ, हर दिन नया और खास।
  7. 🌸 नाज़ुक हूँ, लेकिन हिम्मतवाली भी।
  8. 🌼 खुद को प्यार करो, क्योंकि आप जैसे और कोई नहीं।
  9. 💕 हर दिन नए सपनों के साथ चमकती हूँ।
  10. 🌺 सादगी में भी खूबसूरती है, और मैं इसे जीती हूँ।
  11. ✨ बड़े सपने, बड़ा दिल और एक चमकता हुआ जीवन।
  12. 🌸 खुशी वो चीज़ है जो आपको सबसे खूबसूरत बनाती है।
  13. 💫 तारों से भरी आँखें और दिल में सपनों का आसमान।
  14. 🌼 दिल से प्यार करती हूँ और खुद से भी।
  15. 💖 हर दिन नया फूल खिलाती हूँ, अपनी खुशियों से।
  1. 🌸 जिंदगी की अराजकता को प्यार से गले लगाती हूँ।
  2. 💕 अपनी ही दुनिया की रानी हूँ, जहां सब कुछ प्यारा है।
  3. 🌟 थोड़ा सा जादू हर दिन, और दुनिया चमक उठती है।
  4. 🌼 खुशदिल और चमकती आत्मा के साथ जीती हूँ।
  5. 🌸 सकारात्मकता फैलाती हूँ, क्योंकि यही मेरा तरीका है।
  6. 🦋 जिंदगी छोटी है, इसे मीठे पलों से भर लो।
  7. 💖 आभार से भरी हुई, हर दिन एक नई शुरुआत।
  8. 🌸 मजबूत महिलाएं ही असली शक्ति हैं, और मैं उनमें से एक हूँ।
  9. ✨ पूरे ब्रह्मांड की चमक अपने अंदर महसूस करती हूँ।
  10. 💫 भीड़ में अलग खड़े होने के लिए ही बनी हूँ।
  11. 🌼 चमकते रहो, क्योंकि यही आपकी पहचान है।
  12. 🌺 सुनहरी राहों पर चल रही हूँ, जहां सपने सच होते हैं।
  13. 💕 सबसे पहले खुद से प्यार करो, बाकी सब अपने आप होगा।
  14. 🌸 उसने सोचा, उसने किया और वह जीत गई।
  15. 🌟 जिंदगी की यात्रा को गले लगाओ, हर पल खास है।
  16. 🌼 मिठास और नटखटपन का मेल, यही हूँ मैं।
  17. 💫 नौवे बादल पर उड़ान भर रही हूँ, सपनों के साथ।
  18. 🌸 त्रुटिपूर्ण हूँ, लेकिन फिर भी शानदार हूँ।
  19. 💖 दयालु दिल और तीव्र मस्तिष्क, यही मेरी ताकत है।
  20. 🌼 जिंदगी कठिन है, लेकिन मैं उससे भी ज्यादा।
  21. 🌸 मुस्कान, क्योंकि यही मेरी पहचान है।
  22. ✨ चमकना मेरा स्वाभाव है, चाहे कोई भी रंग हो।
  23. 💫 अपनी आवाज बनो, प्रतिध्वनि नहीं।
  24. 🌼 गुलाबी रंग में जिंदगी सबसे खूबसूरत लगती है।
  25. 🌸 जिंदगी के हर लम्हे को नाचते हुए जीती हूँ।
  26. 🌟 जो हिम्मत करती है, वही जीतती है।
  27. 💕 सरल और अजेय, यही मेरा मंत्र है।
  28. 🌼 जिंदगी एक बड़ा साहसिक कार्य है, और मैं इसके लिए तैयार हूँ।
  29. 💖 रुकना नहीं, आगे बढ़ते रहो।
  30. 🌸 साहसी और दयालु, यही मेरी पहचान है।
  31. 🌺 शक्कर की तरह मीठी और दिल से प्यारी।
  32. ✨ हमेशा जवान और जीवंत रहो।
  33. 💫 यादों का खजाना जोड़ रही हूँ, हर दिन।
  34. 🌸 सुंदरता में अराजकता, और मैं इसे प्यार करती हूँ।
  35. 💕 आजाद आत्मा, जो बस उड़ान भरना जानती है।
  36. 🌼 अपने सपनों पर विश्वास करो, और उन्हें जीओ।
  37. 🌟 दिल से चमको, क्योंकि यही असली चमक है।
  38. 🌸 सपने देखना और उन्हें पूरा करना, यही मेरा उद्देश्य है।
  39. 💖 एक ट्रेंड की दुनिया में क्लासिक बनो।
  40. 💫 टिमटिमाते सितारे मेरी रातों की कहानी हैं।
  41. 🌼 सोने का दिल और चमकती आत्मा।
  42. 🌸 दिल से जंगली फूल, जो हर मौसम में खिलता है।
  43. 🌟 अंदर से चमकती हूँ, क्योंकि यही मेरा स्वभाव है।
  44. 💕 प्यार और रोशनी, यही मेरी जिंदगी का आधार है।
  45. 🌸 मेरी दुनिया की रानी हूँ, और मुझे इस पर गर्व है।
  46. 💫 परी कथा की सपने देखने वाली, जो हकीकत में जी रही हूँ।
  47. 🌼 हमेशा चमकती, क्योंकि मेरा दिल उज्ज्वल है।
  48. 💖 असली और निडर, क्योंकि यही मेरी पहचान है।
  49. 🌸 धूप और तूफान का मिश्रण, और मैं इसे प्यार करती हूँ।
  50. 🌟 सच्ची होने के लिए बनी हूँ, क्योंकि नकलीपन मेरे बस की बात नहीं।
  51. 💕 गुलाबी में खूबसूरत, और यही मेरी पहचान है।
  52. 🌼 अटूट हूँ, क्योंकि जिंदगी ने मुझे मजबूत बना दिया है।
  53. 🌸 अपने सपनों को जी रही हूँ, हर दिन।
  54. 💫 जिंदगी में चमकते हुए, क्योंकि यही मेरी पहचान है।
  55. 🌺 साहसिक कार्य का इंतजार, क्योंकि मुझे चुनौतियां पसंद हैं।
  56. 💖 दबाव में भी शालीनता, यही मेरा स्वभाव है।
  57. 🌸 जिंदगी एक खूबसूरत सवारी है, और मैं इसका आनंद ले रही हूँ।
  58. 🌟 आत्मविश्वास से भरी, और अपनी राह पर।
  59. 🌼 निडर और साहसी, क्योंकि यही मेरा तरीका है।
  60. 🌸 हमेशा खिलती, क्योंकि मेरी आत्मा उज्ज्वल है।
  61. 💫 धूप की फुसफुसाहट, जो मेरे दिल को गर्मी देती है।
  62. 💖 धूप से भरी आत्मा, और एक बड़ा दिल।
  63. 🌸 जंगली बनो, मुक्त बनो, और अपनी पहचान बनाओ।
  64. 💕 जिंदगी एक परी कथा है, और मैं इसकी नायिका हूँ।
  65. 🌼 खुद की नायिका बनो, क्योंकि आपको किसी और की जरूरत नहीं।
  66. 🌸 खुशी चुनो, क्योंकि यही जिंदगी की असली सफलता है।
  67. 🌟 खुश आत्मा, जो हर दिन चमकती है।
  68. 💫 टिमटिमाते सितारे, जो मेरे सपनों की कहानी कहते हैं।
  69. 🌼 इस पल में जियो, क्योंकि यही सच है।
  70. 💖 अनुग्रह और शालीनता, जो मेरे व्यक्तित्व का हिस्सा हैं।
  71. 🌸 बिना डर के सपने देखो, और उन्हें पूरा करो।
  72. 🌟 जिंदगी में चमकते हुए, क्योंकि यही मेरी पहचान है।
  73. 🌼 दिल से जंगली, जो हर दिन खिलता है।
  74. 💕 सकारात्मकता फैलाओ, क्योंकि यही असली शक्ति है।
  75. 🌸 जादू में विश्वास करो, क्योंकि यही जिंदगी को खूबसूरत बनाता है।
  76. 🌺 उठो और चमको, क्योंकि यही आपकी पहचान है।
  77. 💖 अपनी एड़ी, सिर और मानक ऊँचे रखो, क्योंकि आप अनमोल हो।
  78. 🌸 मेरी नसों में चमक, और दिल में प्यार।
  79. 🌟 असीमित हूँ, क्योंकि मेरे सपने अनंत हैं।
  80. 🌼 फूलों की तरह खिलो, और दुनिया को अपनी खुशबू से महकाओ।

आपके इंस्टाग्राम बायो को खास और अद्वितीय बनाना कोई मुश्किल काम नहीं है। थोड़ी सी सोच और अपनी सच्ची पहचान को उजागर करने से आप एक ऐसा बायो बना सकती हैं जो आपको सही मायनों में प्रस्तुत करे। इन बायोस में से कोई भी चुनें या फिर इन्हें अपनी पसंद के अनुसार बदलें, क्योंकि असली खूबसूरती तो आपके खुद के अंदाज में है। अपने सपनों को उड़ान दें, अपने दिल की सुनें, और हमेशा चमकते रहें। आपकी प्रोफाइल (Profile) आपके व्यक्तित्व की झलक है, उसे खास बनाएं और दुनिया को दिखाएं कि आप कितनी अनोखी (Different) हैं!

grep vs egrep

grep and egrep are fundamental command-line utilities in Unix/Linux operating systems, widely used for searching and filtering text. These tools are pivotal in text processing and data analysis, providing powerful functionalities to locate specific patterns within files.

Understanding grep

The grep command, short for “global regular expression print,” searches for patterns within text files. It reads input files line by line, looking for lines that match a specified pattern and then outputs the matching lines. This makes grep an essential tool for quickly finding relevant data in large files.

Basic Regular Expressions in grep

grep utilizes basic regular expressions (BRE) to define search patterns. Regular expressions are sequences of characters that form a search pattern, primarily for use in pattern matching with strings.

Key Regular Expression Syntax in grep:

  • .: Matches any single character except a newline.
  • *: Matches zero or more occurrences of the preceding element.
  • ^: Anchors the match to the start of a line.
  • $: Anchors the match to the end of a line.

Example Commands:

  • grep ‘hello’ file.txt: Searches for lines containing the word “hello”.
  • grep ‘^start’ file.txt: Matches lines beginning with “start”.
  • grep ‘end$’ file.txt: Matches lines ending with “end”.

Understanding egrep

The egrep command, which stands for “extended grep,” is a variant of grep that supports extended regular expressions (ERE). These extended regular expressions provide more advanced and flexible pattern matching capabilities.

Syntax:

egrep [options] pattern [file...]

Extended Regular Expressions in egrep

Extended regular expressions include additional metacharacters that enhance pattern matching.

Key Extended Regular Expression Syntax in egrep:

  • +: Matches one or more occurrences of the preceding element.
  • ?: Matches zero or one occurrence of the preceding element.
  • |: Acts as a logical OR, matching either the expression before or after the pipe.
  • (): Groups expressions for more complex patterns.
  • []: Matches any one of the enclosed characters.

Example Command:

  • egrep ‘(hello|world)’ file.txt: Searches for lines containing either “hello” or “world”.

Common Options for grep and egrep

Both grep and egrep offer a range of options to control their behavior and output:

  • -i: Ignore case distinctions during the search.
  • -v: Invert the match to print lines that do not match the pattern.
  • -n: Prefix each line of output with the line number within its input file.
  • -c: Print a count of matching lines rather than the lines themselves.
  • -r or -R: Recursively search through directories and their subdirectories.
  • -l: List only the names of files containing matching lines, without displaying the matching lines themselves.

Use Cases and Applications

grep and egrep are versatile tools with numerous applications across various fields:

  • Searching Log Files: Essential for finding specific error messages or information in system and application logs.
  • Filtering Command Output: Used to refine the output of other commands, making it easier to handle large datasets.
  • Data Analysis and Text Processing: Facilitates the extraction of specific data points from large text files or datasets.
  • Data Validation and Cleanup: Helps in identifying and correcting data anomalies or validating data formats.
  • Finding and Replacing Text: While primarily for searching, grep and egrep are often part of pipelines that include text replacement.

Summary of grep and egrep

In summary, grep and egrep are powerful text search tools integral to Unix/Linux environments. They enable users to perform efficient and flexible pattern matching, essential for text processing, data analysis, and system administration. While grep uses basic regular expressions, egrep extends these capabilities with support for more advanced patterns. Both tools provide various options to tailor the search and output, making them indispensable for managing and analyzing text data.

grep vs egrep

Featuregrepegrep
Basic PatternsSupports basic regular expressionsSupports extended regular expressions
SyntaxUses Basic Regular Expression (BRE) syntaxUses Extended Regular Expression (ERE) syntax
MetacharactersLimited metacharacters support: . * ^ $ []Extensive metacharacters support: . * ^ $ [] () {} + ? |
Alternation SyntaxNo support for alternation syntax usingSupports alternation syntax using the pipe symbol ( | )
UsageGenerally used for basic pattern matchingUsed when more complex pattern matching is required
PerformanceGenerally faster for simple patternsMay be slower for simple patterns due to added complexity
CompatibilityAvailable on most Unix-like systemsAvailable on most Unix-like systems
Examplegrep ‘apple’ fruits.txtegrepapple|orange‘ fruits.txt
Differencation between grep and egrep
Inode Block Diagram

LINUX/UNIX FILE SYSTEM STRUCTURE

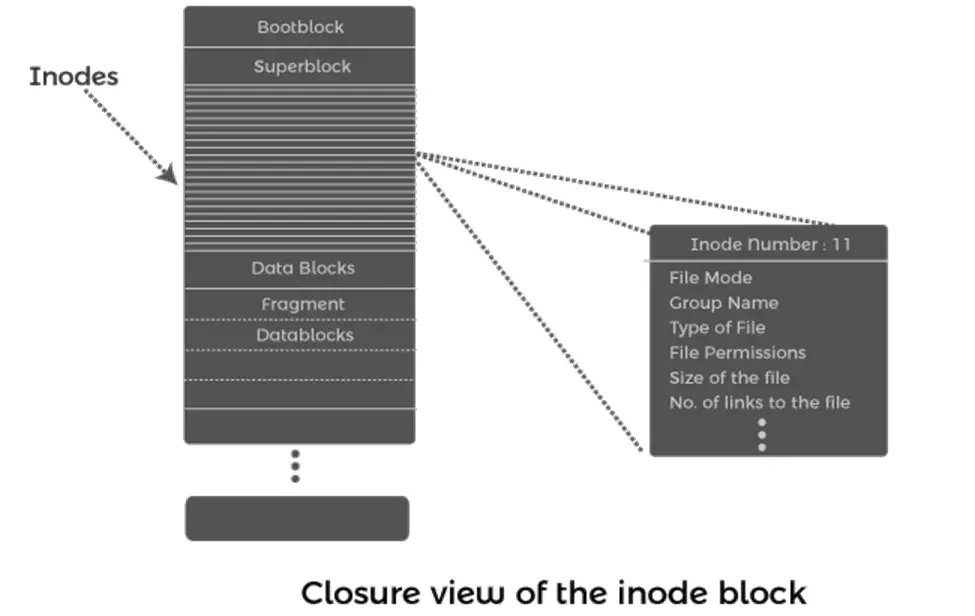
The file system structure in Linux/Unix is a sophisticated architecture designed to efficiently manage and organize data. It comprises several critical components: the boot block, superblock, inode block, and data block. Each of these plays a vital role in ensuring the integrity, accessibility, and performance of the file system.

1. Boot Block

  • Location and Role: The boot block is typically located at the very beginning of the disk or partition. It plays a crucial role during the system boot process by containing the boot loader code.
  • Functionality: The boot loader code is responsible for loading the operating system kernel into memory. This initial step is essential for the system to start. Additionally, the boot loader may include instructions for locating the superblock, which is necessary for mounting the filesystem.

2. Superblock

  • Metadata Structure: The superblock is a critical metadata structure that contains essential information about the filesystem. It usually resides at a fixed location within the filesystem, often near the beginning.
  • Contents: The superblock includes various details such as the filesystem type, size, block size, inode count, block count, and pointers to other important structures within the filesystem.
  • Redundancy: To ensure resilience against corruption, multiple copies of the superblock are distributed throughout the filesystem. This redundancy helps maintain filesystem integrity in case of damage to the primary superblock.

3. Inode Block

  • Data Structures: Inodes are fundamental data structures within the filesystem, each storing metadata about files and directories. The inode block contains a collection of these inode structures.
  • Attributes: Each inode describes attributes of a specific file or directory, including permissions, timestamps, size, and pointers to data blocks. Importantly, inodes do not store file names; directory entries map filenames to inode numbers.
  • Kernel Interaction: When a file is opened, the kernel copies its corresponding inode from disk to main memory. The inode includes various attributes such as the file type, access permissions (read, write, execute), number of links to the file, file length in bytes, and user and group ownership.
  • Inode Numbers: Upon creation, each file is assigned a unique inode number. This identifier is used by the system to manage and access the file. Directory entries in UNIX are treated as files, so they also possess inode numbers. The inode number of a file can be accessed using the ls -i command, while ls -l retrieves detailed inode information.

When a file is opened, the kernel copies its corresponding inode from disk to main memory. The inode includes the type of file, a file’s access information, i.e., read, write or execute several links to the file, length of files in bytes, and representations of the user and group who owns the file.

when a file is created, it is assigned a unique number known as an inode number. In this way, every file in UNIX has an inode number. UNIX treats all directories as files, so they also have an inode number.An inode number assigned to a file can be accessed using the “ls- i” command, while the “ls- l” command will retrieve the inode information

Inode Block Diagram
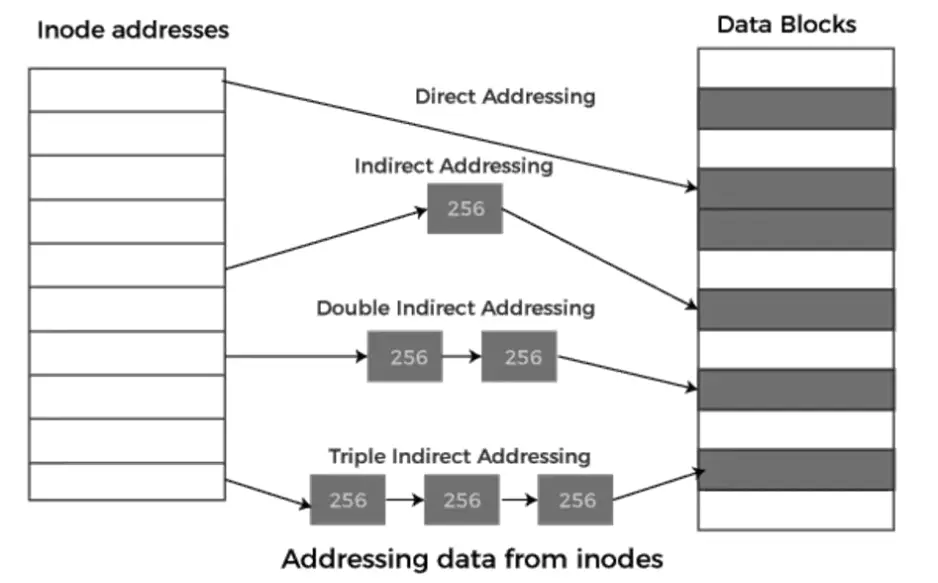
Addressing data from Inodes: Deagram

4. Data Block

  • Storage of Contents: Data blocks are the segments of the filesystem that store the actual contents of files and directories. When a file is created or modified, its data is written to one or more data blocks.
  • Allocation: The number of data blocks allocated to a file depends on the file’s size and the block size of the filesystem. Inodes contain pointers to these data blocks, which can be direct, indirect, doubly indirect, or even triply indirect pointers, depending on the file’s size and structure.

The components of the UNIX/Linux file system work in concert to organize and manage data efficiently. The boot block and superblock provide essential information for the system to locate and mount the filesystem. Inodes and data blocks manage and store the actual data of files and directories, maintaining a robust and flexible structure for handling a vast array of file types and sizes. This architecture is fundamental to the reliability and performance of UNIX/Linux systems, from the initial boot process to the everyday operations of storing and retrieving data.

Network Devices (Hub, Repeater, Bridge, Switch, Router and Gateways)

Network devices like Hub, Repeater, Bridge, Switch, Router and Gateways are essential components in a computer network, enabling communication and connectivity between different network segments and devices. The primary network devices include hubs, repeaters, bridges, switches, routers, and gateways. Each device has a specific role and operates at different layers of the OSI (Open Systems Interconnection) model.

DeviceOSI LayerFunctionUse Case
HubPhysical (Layer 1)Broadcasts data to all devicesSmall, simple networks
RepeaterPhysical (Layer 1)Amplifies and extends signalsExtending network range
BridgeData Link (Layer 2)Connects and filters network segmentsNetwork segmentation
SwitchData Link (Layer 2)Forwards data to specific devicesEfficient data transfer in Ethernet networks
RouterNetwork (Layer 3)Directs data between different networksInternet connectivity, network interconnectivity
GatewayVarious LayersTranslates between different protocolsCommunication between different network architectures

Hub

A hub is a basic networking device used to connect multiple Ethernet devices, making them function as a single network segment. It operates at the physical layer (Layer 1) of the OSI (Open Systems Interconnection) model.

Function

  • Data Transmission: A hub’s primary function is to receive data packets from one of its ports and broadcast them to all other connected ports.
  • Network Extension: Hubs help in extending the reach of a network by allowing more devices to connect.

Working

  • Broadcasting: When a data packet arrives at a hub, it is transmitted to all ports except the one from which it was received. This means every connected device receives the packet, regardless of whether it was the intended recipient.
  • Collision Domain: All devices connected to a hub share the same collision domain, meaning that if two devices try to send data at the same time, a collision occurs, leading to network inefficiencies.

Types of Hubs

  1. Passive Hub: Simply connects devices and forwards signals without amplification. It does not have its own power supply.
  2. Active Hub: Amplifies the incoming signal before broadcasting it to other devices. It has its own power supply and helps in extending the distance over which the signal can travel.
  3. Intelligent Hub (Smart Hub): Includes additional features such as network management and monitoring capabilities.

Advantages

  • Cost-Effective: Hubs are generally cheaper than switches and routers, making them an economical choice for small networks.
  • Simple to Use: Easy to set up with no configuration required, making them suitable for basic networking needs.

Disadvantages

  • Inefficiency: Since hubs broadcast data to all ports, they can cause unnecessary network traffic and collisions, leading to inefficiencies.
  • Limited Functionality: Hubs lack the advanced features found in switches and routers, such as data filtering and intelligent packet forwarding.
  • Security Risks: Broadcasting data to all devices increases the risk of data interception by unauthorized users within the same network.

Repeater

A repeater is a network device used to regenerate and amplify signals in a communication channel, extending the distance over which data can travel without degradation. It operates at the physical layer (Layer 1) of the OSI (Open Systems Interconnection) model.

Function

  • Signal Regeneration: The primary function of a repeater is to receive weak or corrupted signals and regenerate them to their original strength and shape before retransmitting them.
  • Distance Extension: Repeaters help in extending the range of a network by amplifying signals, allowing data to travel longer distances without loss of quality.

Working

  • Receiving Signals: A repeater receives incoming signals from a transmitting device.
  • Amplification and Regeneration: It amplifies the weak signals and regenerates the signal to its original form to combat attenuation and noise.
  • Retransmission: The regenerated signal is then transmitted to the next segment of the network, ensuring that the data can travel further without degradation.

Types of Repeaters

  1. Analog Repeater: Amplifies the analog signals without converting them to digital form. It is mainly used in older communication systems.
  2. Digital Repeater: Converts the analog signal to digital form, regenerates it, and then converts it back to analog before transmission. This type is commonly used in modern digital networks.
  3. Wireless Repeater: Extends the range of wireless networks by receiving and retransmitting wireless signals.

Advantages

  • Extended Range: Allows networks to cover larger geographical areas by boosting signal strength.
  • Improved Signal Quality: Enhances the quality of transmitted data by regenerating weakened signals, reducing errors caused by noise and attenuation.
  • Cost-Effective: Provides an economical solution for extending network reach without requiring extensive infrastructure changes.

Disadvantages

  • No Traffic Management: Unlike more advanced devices such as routers or switches, repeaters do not manage network traffic or filter data.
  • Limited Functionality: Repeaters do not segment the network or reduce collisions, which can be a limitation in high-traffic networks.
  • Propagation Delay: Introduces a slight delay due to the time taken to regenerate the signal, which can accumulate over multiple repeaters.

Bridge

A bridge is a network device used to connect and filter traffic between two or more network segments, effectively managing the flow of data and reducing network congestion. Operating at the data link layer (Layer 2) of the OSI (Open Systems Interconnection) model, bridges play a crucial role in improving network efficiency and performance.

Function

  • Network Segmentation: Bridges divide a larger network into smaller, more manageable segments, reducing the size of collision domains and improving overall network performance.
  • Traffic Filtering: By analyzing the MAC addresses of incoming data packets, bridges determine whether to forward or filter them, ensuring that only necessary traffic is sent to each network segment.

Working

  • Learning: Bridges learn the MAC addresses of devices on each connected segment by examining the source address of incoming frames. This information is stored in a MAC address table.
  • Forwarding: When a frame is received, the bridge checks its MAC address table to decide whether to forward the frame to another segment or drop it if it is destined for the same segment.
  • Filtering: Frames that are not needed on other segments are filtered out, reducing unnecessary traffic and collisions.

Types of Bridges

  1. Local Bridge: Connects two or more segments within the same local area network (LAN).
  2. Remote Bridge: Connects LAN segments over a wide area network (WAN), often using point-to-point links or VPNs.
  3. Wireless Bridge: Connects LAN segments wirelessly, allowing for the extension of network segments without physical cabling.

Advantages

  • Reduced Collisions: By segmenting a network, bridges decrease the likelihood of collisions, improving overall network efficiency.
  • Enhanced Security: Bridges can be configured to filter and control the flow of traffic, providing an additional layer of security.
  • Cost-Effective: Bridges are relatively inexpensive and provide a straightforward solution for network segmentation and traffic management.

Disadvantages

  • Limited Scalability: While effective for small to medium-sized networks, bridges may not scale well in very large networks due to their limited capacity for managing a high volume of MAC addresses.
  • Latency: The process of filtering and forwarding can introduce slight delays, which may accumulate in networks with multiple bridges.
  • No Traffic Prioritization: Unlike more advanced devices such as switches or routers, bridges do not prioritize traffic, which can be a limitation in networks with varying types of data.

Switch

A switch is a fundamental network device that connects multiple devices within a local area network (LAN) and uses MAC addresses to forward data to the correct destination. Operating primarily at the data link layer (Layer 2) of the OSI (Open Systems Interconnection) model, switches can also function at the network layer (Layer 3) to perform routing tasks.

Function

  • MAC Address Learning: Switches learn the MAC addresses of devices connected to each port by analyzing incoming frames and storing the information in a MAC address table.
  • Data Forwarding: Based on the MAC address table, switches forward data frames only to the specific port that leads to the destination device, rather than broadcasting to all ports.
  • Network Segmentation: Switches segment a network into multiple collision domains, reducing the likelihood of collisions and improving overall network performance.

Working

  • Frame Reception: When a switch receives a data frame on one of its ports, it examines the frame’s destination MAC address.
  • MAC Address Table Lookup: The switch looks up the destination MAC address in its MAC address table to determine the appropriate port to forward the frame.
  • Forwarding Decision: If the destination MAC address is found in the table, the switch forwards the frame to the corresponding port. If the address is not found, the switch floods the frame to all ports except the one it was received on, a process called “flooding.”
  • Learning Process: As devices communicate, the switch continues to learn and update its MAC address table with the source MAC addresses of incoming frames.

Types of Switches

  1. Unmanaged Switch: Simple, plug-and-play devices with no configuration options, suitable for small networks.
  2. Managed Switch: Offers advanced features such as VLANs (Virtual LANs), SNMP (Simple Network Management Protocol), and port mirroring, allowing for greater control and network management.
  3. Layer 3 Switch: Combines the functionalities of a switch and a router, capable of routing traffic based on IP addresses in addition to MAC addresses.

Advantages

  • Reduced Collisions: By creating separate collision domains for each connected device, switches significantly reduce network collisions.
  • Efficient Data Transfer: Forwarding data only to the intended recipient improves network efficiency and bandwidth utilization.
  • Scalability: Switches can easily scale to accommodate growing networks by adding more ports or linking multiple switches together.
  • Advanced Features: Managed switches offer advanced network management features such as VLANs, Quality of Service (QoS), and security controls.

Disadvantages

  • Cost: Managed switches, particularly Layer 3 switches, can be expensive compared to simpler devices like hubs or unmanaged switches.
  • Complexity: The configuration and management of advanced switches require network expertise and can be complex.
  • Latency: Although minimal, the process of learning, looking up, and forwarding frames can introduce slight latency in data transmission.

Router

A router is a network device that forwards data packets between computer networks, directing traffic on the internet. Operating at the network layer (Layer 3) of the OSI (Open Systems Interconnection) model, routers use IP addresses to determine the best path for forwarding packets to their destinations.

Function

  • Packet Forwarding: Routers receive incoming data packets and determine the best route to forward them to their destination based on IP addresses.
  • Network Interconnection: They connect multiple networks, including different LANs and WANs, allowing devices on different networks to communicate.
  • Routing: Routers use routing tables and protocols to discover and maintain information about the paths data can take to reach various network destinations.

Working

  1. Receiving Packets: A router receives data packets on one of its interfaces.
  2. Examining Headers: It examines the packet’s header to determine the destination IP address.
  3. Routing Table Lookup: The router looks up its routing table to find the best next hop or path for the packet.
  4. Forwarding Decision: Based on the routing table and routing algorithms, the router forwards the packet to the appropriate interface leading to the destination network.

Types of Routers

  1. Home Router: Typically used in residential settings to connect home networks to the internet. These routers often combine the functions of a router, switch, and wireless access point.
  2. Core Router: High-performance routers used in the backbone of large networks, such as ISPs (Internet Service Providers) or large enterprises, to manage substantial amounts of data traffic.
  3. Edge Router: Positioned at the edge of a network, these routers connect internal networks to external networks, such as the internet.
  4. Virtual Router: A software-based router that runs on virtualized hardware, often used in data centers or cloud environments.

Advantages

  • Efficient Data Routing: Routers intelligently direct data packets using optimized paths, improving network efficiency and performance.
  • Network Segmentation: By connecting different networks, routers help segment traffic, reducing congestion and improving security.
  • Scalability: Routers can be scaled up to handle increased data traffic by adding more routing capabilities or upgrading to more powerful models.
  • Advanced Features: Routers support various features such as Network Address Translation (NAT), firewall capabilities, Quality of Service (QoS), and Virtual Private Networks (VPNs), enhancing security and performance.

Disadvantages

  • Cost: High-performance routers, especially those used in enterprise and core networks, can be expensive.
  • Complexity: Configuring and managing routers, particularly in large and complex networks, requires significant expertise and can be complex.
  • Latency: Routing decisions introduce some latency, though generally minimal, which can affect time-sensitive applications.

Gateway

A gateway is a network device that acts as a bridge between two different networks, allowing them to communicate despite differences in protocols, data formats, or architectures. Operating at various layers of the OSI (Open Systems Interconnection) model, gateways perform protocol conversions to facilitate seamless communication between heterogeneous networks.

Function

  • Protocol Conversion: Gateways translate data from one network protocol to another, enabling interoperability between different network systems.
  • Network Interconnection: They connect networks that use different communication protocols, ensuring that data can be exchanged and understood on both sides.
  • Application Layer Gateway: In some cases, gateways operate at the application layer, translating application-specific data formats and protocols.

Working

  1. Receiving Data: A gateway receives data packets from one network.
  2. Protocol Translation: It analyzes the packet’s format and protocol, then translates it into the appropriate format and protocol required by the destination network.
  3. Forwarding Data: The translated data is then forwarded to the destination network, ensuring that it can be correctly interpreted and used by the receiving system.

Types of Gateways

  1. Network Gateway: Connects two networks with different protocols, such as a local area network (LAN) and a wide area network (WAN).
  2. Internet Gateway: Provides access between an internal network and the internet, often incorporating firewall and security functions.
  3. Email Gateway: Translates email protocols (e.g., from SMTP to X.400) to enable email communication between different systems.
  4. VoIP Gateway: Converts voice data between VoIP (Voice over IP) and traditional PSTN (Public Switched Telephone Network) systems.
  5. API Gateway: Manages and facilitates communication between different application services by translating API calls and responses.

Advantages

  • Interoperability: Gateways enable seamless communication between different network systems, promoting interoperability.
  • Protocol Flexibility: They allow organizations to use varied protocols and technologies without compatibility issues.
  • Enhanced Security: Many gateways include security features, such as firewalls and intrusion detection systems, to protect data during transmission.
  • Application Integration: Gateways can integrate disparate applications, enabling them to work together more effectively.

Disadvantages

  • Complexity: Gateways can be complex to configure and manage, especially when dealing with multiple protocols and large networks.
  • Cost: High-end gateways, especially those with advanced features and high throughput, can be expensive.
  • Latency: Protocol conversion and data translation can introduce latency, which might affect performance-sensitive applications.

TCP vs UDP

Transmission Control Protocol (TCP) and User Datagram Protocol (UDP) are two core protocols in the Internet Protocol (IP) suite. They both serve as methods for data transmission over networks, but they differ significantly in their design, functionality, and use cases.

Transmission Control Protocol (TCP)

The Transmission Control Protocol (TCP) is one of the main protocols in the Internet Protocol (IP) suite, playing a crucial role in the reliable transmission of data over computer networks. TCP ensures that data sent from one end (a client or server) to another arrives accurately and in the correct sequence, making it a foundational protocol for many internet applications.

Key Features of TCP

  1. Connection-Oriented Protocol:
    • Establishment: TCP requires a connection to be established between the sender and receiver before data transmission can begin. This is achieved through a process known as the three-way handshake.
    • Maintenance: During the data transfer phase, TCP maintains the connection, ensuring both sides are synchronized.
    • Termination: The connection is terminated in a controlled manner once the data transfer is complete.
  2. Reliable Data Transfer:
    • Error Detection and Correction: TCP uses checksums to detect errors in transmitted segments. If an error is detected, the corrupted segment is retransmitted.
    • Acknowledgments: The receiver sends acknowledgments for received segments. If the sender does not receive an acknowledgment within a certain timeframe, it retransmits the segment.
    • Retransmission: Lost or corrupted segments are retransmitted, ensuring all data reaches the destination correctly.
  3. Flow Control:
    • TCP implements flow control using the sliding window mechanism to ensure that a sender does not overwhelm a receiver by sending too much data too quickly.
  4. Congestion Control:
    • Algorithms: TCP employs algorithms such as Slow Start, Congestion Avoidance, Fast Retransmit, and Fast Recovery to manage congestion in the network, preventing packet loss and ensuring efficient use of network resources.
  5. Ordered Data Delivery:
    • Sequence Numbers: Each byte of data is assigned a sequence number. The receiver uses these sequence numbers to reassemble the data in the correct order.
    • Buffering: Out-of-order segments are buffered until all preceding segments have arrived.
  6. Full Duplex Communication:
    • TCP supports simultaneous two-way data transmission, allowing data to be sent and received concurrently on the same connection.

TCP Header Structure

A typical TCP segment consists of the following fields:

  1. Source Port (16 bits): Identifies the sending port.
  2. Destination Port (16 bits): Identifies the receiving port.
  3. Sequence Number (32 bits): Indicates the sequence number of the first byte of data in the segment.
  4. Acknowledgment Number (32 bits): Indicates the next sequence number that the sender of the segment is expecting to receive.
  5. Data Offset (4 bits): Specifies the size of the TCP header.
  6. Reserved (3 bits): Reserved for future use and should be set to zero.
  7. Flags (9 bits): Control flags (e.g., SYN, ACK, FIN) indicating the state of the connection.
  8. Window Size (16 bits): Specifies the size of the receiver’s buffer space.
  9. Checksum (16 bits): Used for error-checking of the header and data.
  10. Urgent Pointer (16 bits): Indicates if there is urgent data.
  11. Options (variable): Used for various TCP options.
  12. Data (variable): The actual data being transmitted.

Three-Way Handshake

The three-way handshake process establishes a connection between the client and server:

  1. SYN: The client sends a segment with the SYN (synchronize) flag set to initiate a connection.
  2. SYN-ACK: The server responds with a segment that has both SYN and ACK (acknowledge) flags set, acknowledging the client’s SYN.
  3. ACK: The client responds with a segment that has the ACK flag set, completing the connection establishment.

TCP Connection Termination

The termination of a TCP connection is a four-step process:

  1. FIN: The sender sends a segment with the FIN (finish) flag set to initiate termination.
  2. ACK: The receiver acknowledges the FIN segment.
  3. FIN: The receiver sends a FIN segment to the sender.
  4. ACK: The sender acknowledges the receiver’s FIN segment, closing the connection.

Use Cases

TCP is widely used in applications where reliable, ordered delivery of data is crucial. Common use cases include:

  • Web Browsing: HTTP/HTTPS protocols use TCP to ensure web pages are delivered accurately.
  • Email: Protocols like SMTP, POP3, and IMAP rely on TCP.
  • File Transfer: FTP and SFTP use TCP for reliable file transfers.
  • Remote Access: Protocols like SSH and Telnet use TCP to maintain secure and reliable remote sessions.

User Datagram Protocol (UDP)

User Datagram Protocol (UDP) is a core protocol of the Internet Protocol (IP) suite, used for transmitting data across networks. Unlike TCP, UDP is a connectionless protocol that provides minimal error checking and does not guarantee the delivery, order, or integrity of data packets. Despite these limitations, UDP is highly efficient and suitable for applications that require fast, real-time communication where occasional data loss is acceptable.

Key Features of UDP

  1. Connectionless Protocol:
    • No Connection Establishment: UDP does not establish a connection before data transmission. Each data packet (datagram) is sent independently of others, which reduces overhead and latency.
    • No Connection Termination: Similarly, there is no formal termination of a session, making the protocol lightweight and fast.
  2. Unreliable Data Transfer:
    • No Acknowledgments: UDP does not require acknowledgments for received packets, meaning the sender has no confirmation that the data has been received.
    • No Retransmissions: If a packet is lost during transmission, it is not retransmitted. This makes UDP less reliable but also faster than TCP.
    • No Order Guarantee: Packets may arrive out of order, and it is up to the application layer to handle reordering if necessary.
  3. Minimal Error Checking:
    • Checksum: UDP includes a checksum for error detection, but it is optional. If an error is detected, the packet is simply discarded without any retransmission or error correction.
  4. Low Overhead:
    • Simple Header: The UDP header is simpler and shorter than the TCP header, contributing to lower overhead and faster processing. The UDP header contains only the essential fields needed for basic functionality.

UDP Header Structure

A typical UDP datagram consists of the following fields:

  1. Source Port (16 bits): Identifies the sending port.
  2. Destination Port (16 bits): Identifies the receiving port.
  3. Length (16 bits): Specifies the length of the UDP header and data.
  4. Checksum (16 bits): Used for error-checking of the header and data.

Use Cases

UDP is well-suited for applications that prioritize speed and efficiency over reliability. Common use cases include:

  • Streaming Media: Video and audio streaming services (e.g., Netflix, YouTube, Spotify) use UDP to ensure low latency and smooth playback, even if some data packets are lost.
  • Online Gaming: Real-time multiplayer games use UDP to maintain fast communication between players, as speed is more critical than the occasional loss of data.
  • VoIP (Voice over IP): Applications like Skype and Zoom use UDP for real-time voice and video communication, where minor data loss is less noticeable than delays.
  • DNS Queries: The Domain Name System (DNS) uses UDP for quick and efficient name resolution queries.
  • Broadcast and Multicast: UDP is suitable for broadcasting and multicasting, where data is sent to multiple recipients simultaneously without the need for individual connections.

Advantages and Disadvantages of UDP

Advantages:

  • Low Latency: The lack of connection establishment and acknowledgment mechanisms results in lower latency, making UDP ideal for time-sensitive applications.
  • Reduced Overhead: The simple header and connectionless nature of UDP reduce processing overhead, improving efficiency and speed.
  • Scalability: UDP’s ability to handle broadcasts and multicasts makes it suitable for applications requiring data distribution to multiple recipients.

Disadvantages:

  • Unreliable Delivery: Without mechanisms for acknowledgment and retransmission, UDP does not guarantee that data packets will reach their destination.
  • No Order Guarantee: Packets may arrive out of order, which can be problematic for applications that require ordered data.
  • Minimal Error Handling: Limited error-checking capabilities mean that corrupted packets are discarded without correction, potentially leading to data loss.

Comparative Table

FeatureTCPUDP
Connection TypeConnection-orientedConnectionless
ReliabilityHigh (guarantees delivery, order)Low (no guarantees)
Error CheckingYes (checksums, acknowledgments)Yes (checksums, but minimal)
Flow ControlYesNo
Use CasesWeb browsing, email, file transferStreaming, gaming, broadcasting
OverheadHighLow
SpeedSlower due to overheadFaster, minimal overhead
Order of PacketsGuaranteedNot guaranteed
RetransmissionYesNo
Sundar Pichai

The Journey of Sundar Pichai: From Chennai to the Helm of Google

Sundar Pichai’s journey from a modest upbringing in Chennai, India, to becoming the CEO of Alphabet Inc., the parent company of Google, is a story of hard work, intelligence, and vision. His life shows how education and determination can transform someone’s future.

Sundar Pichai

Early Life and Education

Sundar Pichai was born on June 10, 1972, in Madurai, Tamil Nadu, India. He grew up in Chennai, where his father worked as an electrical engineer, managing a factory that made electrical components. His mother was a stenographer before becoming a homemaker. Despite their modest means, Pichai’s parents valued education highly.

From a young age, Pichai showed a keen interest in technology and engineering. He attended Jawahar Vidyalaya, a school in Ashok Nagar, Chennai, and later Vana Vani School at IIT Madras. His academic talents earned him a place at the prestigious Indian Institute of Technology (IIT) Kharagpur, where he studied Metallurgical Engineering. His professors recognized his potential and recommended him for further studies at Stanford University.

Moving to the United States

With a scholarship, Pichai moved to the United States to pursue a Master’s in Material Sciences and Engineering from Stanford University. This was a significant change, not just in location but also in academic and cultural exposure. The advanced research environment at Stanford helped him build a strong foundation for his career.

After Stanford, Pichai chose to earn an MBA from the Wharton School of the University of Pennsylvania. There, he was recognized as a Siebel Scholar and a Palmer Scholar for his academic excellence.

Joining Google

Pichai joined Google in 2004, a critical year for the company as it had just gone public. His early projects included working on the Google Toolbar, which helped users of Internet Explorer and Firefox access Google search more easily, significantly increasing Google’s search traffic.

However, Pichai’s most notable contribution was the development of Google Chrome. Launched in 2008, Chrome offered a fast, simple, and secure browsing experience. Today, it is the world’s most popular web browser, showcasing Pichai’s vision and leadership.

Rising Through the Ranks

Pichai’s success with Chrome led to rapid promotions within Google. He later managed other key products such as Gmail, Google Maps, and Google Drive. His ability to lead and innovate across different platforms demonstrated his deep understanding of technology and user needs.

In 2013, Pichai was appointed to lead Android, the world’s most popular mobile operating system. Under his leadership, Android’s reach grew significantly, cementing its place as a crucial part of Google’s ecosystem.

Becoming CEO of Google

In August 2015, Google restructured to form Alphabet Inc. Pichai was named CEO of Google, overseeing its core businesses including Search, Ads, Maps, the Play Store, and YouTube.

As CEO, Pichai has focused on artificial intelligence and cloud computing. He has guided the company towards a future where AI is central to its products and services. His calm, strategic approach and ability to handle complex challenges have earned him widespread respect.

CEO of Alphabet Inc.

In December 2019, Pichai’s role expanded further when he became CEO of Alphabet Inc. This position put him in charge of a broader range of initiatives and investments, including Waymo (self-driving cars), Verily (life sciences), and other innovative projects.

Legacy and Impact

Sundar Pichai’s journey is a powerful example of how education and perseverance can take someone from humble beginnings to the top of a global company. His leadership style, marked by humility and a relentless focus on innovation, inspires many aspiring entrepreneurs and technologists worldwide.

Under his guidance, Google and Alphabet are advancing in artificial intelligence, quantum computing, and other groundbreaking technologies. As he continues to lead these tech giants into the future, Sundar Pichai’s story remains a shining example of what is possible through hard work, vision, and a commitment to positive impact.

GPT-4 Vision API

See With AI: Exploring the Power of GPT-4 Vision API

GPT-4 Vision API
GPT-4 Vision API image

The world of Artificial Intelligence (AI) is constantly evolving, pushing the boundaries of what’s possible. One exciting development is the GPT-4 series from OpenAI, a family of powerful language models. But did you know GPT-4 goes beyond just text? Introducing the GPT-4 Vision API, a revolutionary tool that bridges the gap between image and understanding.

What is the GPT-4 Vision API?

Imagine a system that can analyze images and provide insightful descriptions, answer your questions about the content, or even generate creative text captions. That’s the magic of GPT-4 Vision API. This multimodal AI model combines the prowess of GPT-4 for natural language processing with advanced computer vision capabilities.

How Does it Work?

The GPT-4 Vision API is surprisingly user-friendly. You can interact with it in two ways:

  • Image URL: Simply provide the web address of the image you want analyzed.
  • Base64 Encoding: Encode the image data and send it directly through the API.

Once the image is received, GPT-4 goes to work. It extracts visual features, understands the context, and generates a textual response. This response can be a summary of the image content, answers to specific questions, or creative text formats like captions or poems inspired by the image.

Benefits of Using GPT-4 Vision API

The GPT-4 Vision API opens doors to more than enough applications, including:

  • Image Classification: Automatically categorize and organize images based on their content.
  • Content Moderation: Identify inappropriate content within images for safer online environments.
  • Image Description for Accessibility: Generate detailed descriptions of images for visually impaired users.
  • Creative Text Generation: Produce captions, poems, or stories inspired by images, aiding content creators.
  • Market Research: Analyze product images and user reactions to understand consumer preferences.

Getting Started with GPT-4 Vision API

OpenAI offers the GPT-4 Vision API through its user-friendly platform. Here’s a quick guide:

  1. Sign up for an OpenAI API account.
  2. Familiarize yourself with the GPT-4 Vision API documentation [OpenAI Vision API Documentation]. This comprehensive guide explains everything you need to know, from input formats to cost calculations.
  3. Explore the API through code examples. OpenAI provides code snippets in various programming languages to get you started quickly.

The Future of Image Understanding

The GPT-4 Vision API represents a significant leap forward in AI-powered image analysis. As this technology continues to evolve, we can expect even more sophisticated applications and a future where machines can truly “see” the world around them.

Ready to explore the potential of GPT-4 Vision API? Sign up for an OpenAI account today and unlock the power of image understanding!